Configuring UPS Automated User Sync Settings
When using User Provisioning Service with Policy & Procedure Management, you will need to configure the Automated User Synchronization preference settings to let Policy & Procedure Management know the name of and how to manage the user sync file.
Important: Follow these instructions if you are using User Provisioning Service's built-in Active Directory sync feature or have prepared a user sync file yourself.
Configure UPS Automated User Sync Settings
- Log in to Policy & Procedure Management as an administrator.
- Click Settings & Tools > IT Settings, and then click Automated User Synchronization.

- On the Configuration Settings tab, for File Location, type the user sync file name. If you are using User Provisioning Service's built-in Active Directory sync feature, this will be the file name specified on the Active Directory tab in User Provisioning Services. Otherwise, it will be whatever name given to the user sync file that you or a custom application prepared and placed in the upload folder.
Important: No path information is needed before the file name and make sure that the file name you specify here exactly matches—both in spelling and case—the name of the file to be uploaded.
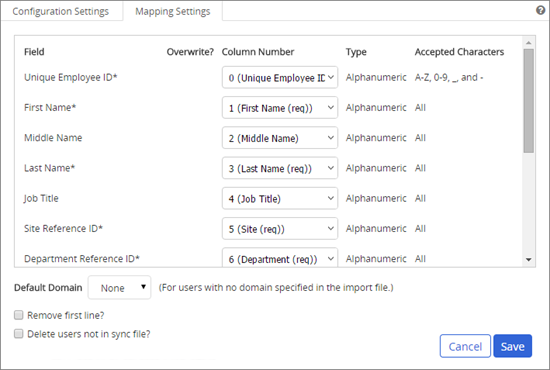
- Click the Mapping Settings tab, and then do any of the following:
Important: The Mapping Settings tab will not be activated until a sync file is uploaded to the hosted Policy & Procedure Management server. You may need to wait up to 24 hours before you can complete this step.
Policy & Procedure Management retrieves the column headers (first row) from the sync file and lists them in the Column Number column of Mapping Settings.
If the content of a Column Number field does not match what is listed in the Field column, you can select the correct column number.
If the sync file contains a column header row, you can select Remove first line? so that the export file column headers are not interpreted as user information.
If you do not want a field imported and synced, in the Column Number for that field, select Not in File.
- Click Save.
- Click the Configuration Settings tab, select Activate Synchronization, and then click Save.
This publication was written and produced at NAVEX Global, Inc., Lake Oswego, Oregon. This publication or any portion thereof is confidential and/or proprietary and may not be reproduced or used in any manner whatsoever without the express written permission of NAVEX Global, Inc.
Copyright © 2025 NAVEX Global, Inc. NAVEX Global® is a registered trademark/service mark of NAVEX Global, Inc. The NAVEX Global® logo is a trademark/service mark of NAVEX Global, Inc. Unauthorized use of NAVEX Global, Inc.’s trademarks/service marks is strictly prohibited without prior written permission from NAVEX Global, Inc.